
Academics
Report Card Designer
Design the report card your school prints. Reorder and switch off sections, choose what each one shows, pick a style, and give different classes different cards, with a live preview of a real pupil's card as you work.
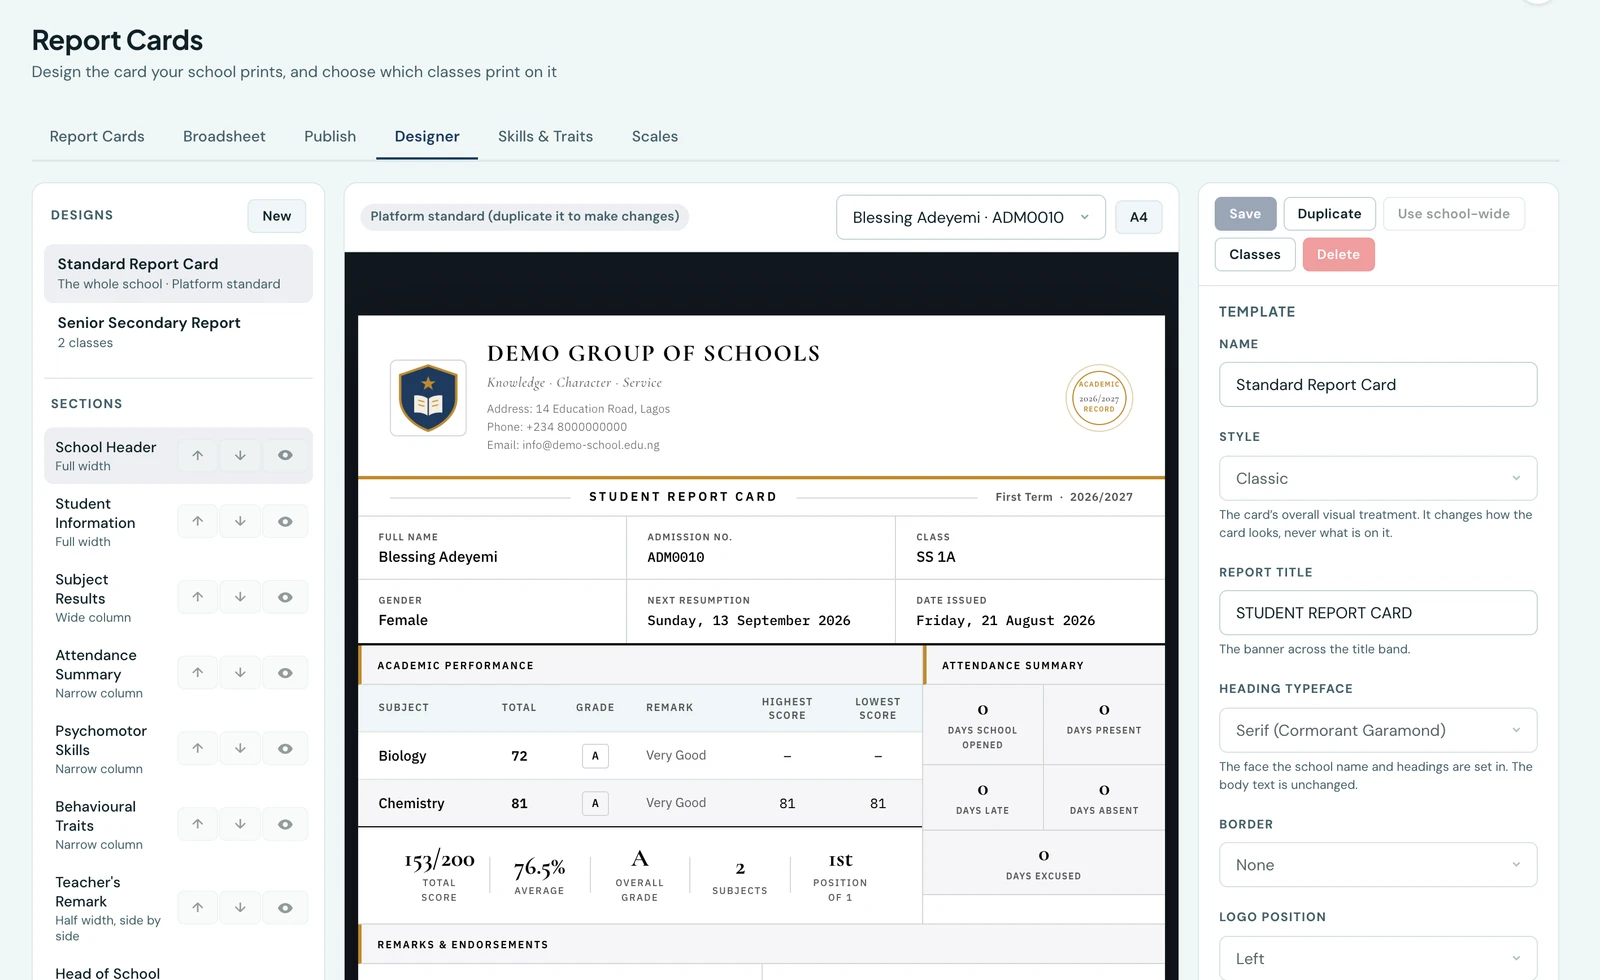
Every school's report card looks slightly different, and until now yours looked like ours. The Report Card Designer hands that decision back: which sections appear, what order they run in, what each one shows, and how the whole thing is styled.
Where to find it
Report Cards under Academics in the main menu, then the Designer tab. You need the Manage report card configuration permission, which the Owner and School Administrator roles hold by default; a teacher sees the same page with only the Report Cards tab on it.
The three panes
- Left lists your designs, and beneath them the sections of whichever design is open
- Middle is the card itself, drawn against one of your own pupils and their real marks
- Right is everything you can change about the template as a whole, and about whichever section you have selected
The preview is not an impression of the card. It is the card, rendered by the same code that produces the PDF a parent downloads, so what you see is what will print.
Designs
Your school starts with one design, the Standard Report Card, which is what the platform has always printed. It is your school's own copy, so you can change it directly: open it, make your changes and press Save. No other school is affected. It cannot be deleted, and Reset to standard always puts our design back if you change your mind.
- New creates a design from the standard card
- Duplicate copies whichever design is open, for when you want a second design rather than a change to this one
- Reset to standard puts the platform's sections, settings and colours back on the open design, keeping its name and the classes printing on it
- Use school-wide makes a design the one your school prints
- Classes chooses which classes print on it instead (see below)
- Delete removes a design you no longer use
Changes to sections, settings and colours affect nothing until you press Save. Saving the design your school prints changes every card printed from then on, and so does Reset to standard, which takes effect as soon as you confirm it. A new design does not become the school's card until you choose Use school-wide or give it some classes. Every one of these actions is recorded in your school's audit log, with who did it.
Sections
The card is made of sections: the school header, the pupil's details, the subject table, attendance, psychomotor skills, behavioural traits, the teacher's and head of school's remarks, the grading key, the signatures, the footer, and the next resumption date.
Each one can be:
- Moved up or down the card with the arrows
- Switched off with the eye, which takes it off every card printed on this design
- Positioned as full width, as the wide or narrow column of a two-column band, or as one of a pair sitting side by side
Sections that sit next to each other in the same band are printed side by side, which is how the subject table ends up with attendance and the skills grids beside it, and how the two remarks end up next to each other. Two sections that carry the same heading print it once between them.
A section with nothing to say is left out of the printed card by itself. A pupil with no skills rated does not get an empty box where the ratings would be.
What each section can show
Select a section and the right-hand panel lists its own settings. Some of the ones schools ask for most:
- Subject results. Show or hide the assessment breakdown, the total, the grade, the remark, the class high and low, the class average per subject, the previous terms, and the summary bar. Hide unscored assessment columns drops a column a pupil has no mark in at all
- Positions, also under subject results. No card ranks a pupil until you say so: Show position in class prints their place in the whole class on the summary bar, and Show position in each subject adds a column ranking them subject by subject. The two are separate, so you can print either, both or neither. To print a position, open the design your school uses, switch the position on and press Save. Switching the summary bar off takes the position in class with it, since that is where it prints
- Attendance. Choose which figures print (days opened, present, late, absent, excused) and in what order
- Psychomotor skills and behavioural traits. Draw the list as rows, as a grid of two or more columns, or compactly inline for a school with a long catalogue
- Grading key. Compact along one line, or expanded with each grade's meaning beside it
- Resumption date. Call it "Next Resumption", "School Resumes", or whatever your school says
- Footer. The stamp ring, your own wording instead of the standard note, and the document reference
Colours
The card prints as a white sheet in black type, and your school's colours are spent on its lines rather than on filled bands: it is the register that costs an office printer nothing and stays legible in mono. The colours follow the school on their own, so change the school's and every design that has not overridden them follows.
Where you want the report card to look different from the rest of the platform, the Colours panel lets a design set its own. There are two, described by where they print rather than by name:
- The main colour draws the sheet's outer border, and only that. The border is off unless you switch it on under Border below, and of the three that draw, only Thick and Double use this colour: Thin is a plain grey hairline. So on a card with no border, or a thin one, setting a main colour changes nothing you can see
- The accent colour draws the lines the sheet is ruled with: the rule under the letterhead, the ring and lettering of the academic seal, the edge beside each section heading, and the rule above the footer with its stamp ring. The Modern style is the exception to the section headings: it underlines them in black instead of ruling their edge, so on Modern the accent colour shows in the letterhead, the seal and the footer only
Each is off by default and says which of the school's colours it is inheriting, with a swatch. Turn one on and it starts from that same colour, so nothing jumps; turn it off again and the card goes back to following the school. That is the difference the panel is careful to keep: a design with no override is not "a design that happens to use teal", it is one that follows the school for good.
The logo is not set here. It comes from your school profile, where there is somewhere to upload one, and follows every card automatically.
The template as a whole
Above the sections sit the choices that apply to the whole sheet:
- Style. Classic, Modern, Compact or Executive. Compact is the one to reach for when a long subject list is spilling onto a second page
- Report title. The wording on the title line, under the letterhead
- Heading typeface. Serif or sans-serif for the school name and headings
- Border, logo position, school name in capitals or as typed, and whether the academic seal prints
Your school's logo, address, motto and contact details are not set here. They come from your school profile and follow every card automatically.
A different card for different classes
Press Classes on a design and tick the classes that should print on it. A class with no design of its own prints on the school-wide one, so the usual arrangement is a single card for the school and a second design for, say, the senior classes.
A class can only ever print on one design. Ticking a class that already prints on another design moves it, and the drawer tells you where it is moving from before you save.
Early years classes are not in the list. Their pupils are assessed developmentally and print the early years report instead, so there is no standard card for a design to apply to them.
Previewing against a real pupil
The picker above the preview lists pupils who actually have marks recorded, most recent first. This is deliberate: the question you are really asking is whether the design fits your school, and an invented pupil with three tidy subjects and a short name would answer it wrongly for a school with fourteen subjects and double-barrelled surnames.
Switch between Fit to width and A4 to see the card at the size it prints.
Everywhere the card appears
A design applies everywhere that report card is produced: the card a member of staff opens, the one a parent or pupil sees in their portal, the PDF downloaded from any of them, the bulk-generated PDFs for a whole class, and the card in the mobile app, which displays the school-generated PDF.
Early years pupils are assessed differently and have their own developmental report, which this designer does not cover.
Ready to try it with your school?
Three-month Basic trial. No card required to register.